
Wednesday, September 15, 2010
Monday, August 23, 2010
Bricked PSP?
Generally if you have a bricked PSP, your Sony PlayStation Portable will still switch on, as in the green light shows but there will be no picture showing on the LCD screen and there will also be no sound. The green light will stay on for approximately 30-40 seconds and then shut down.
A PSP generally becomes bricked if it is turned off or runs out of battery during a firmware/software update. The best way the unbrick your PSP is to buy a Pandora battery and Magic Memory Stick. Using these two items you will then be able to unbrick/reboot your PSP to full working order. If you have any questions regarding unbricking a PSP or where to purchase Pandora Batteries and Magic Memory Sticks from please email me.
Sunday, August 22, 2010
PSP Advice - Removing The Power Switch Board
There are no screws attaching the power switch board to your PSP console, they simply click into place but there is one cable ribbon attached so please bear this in mind when removing. The only tool you will need is a small flathead screwdriver.
 First of all you need to take off the right hand shoulder button aswell as the metal clip in which holds down the rubber pad for said shoulder button. To remove the metal clip use your small flathead screwdriver and gently lift it up from where it connects to the PSP console.
When that is done you should then be able (with flathead screwdriver again) start to gently prise the PSP power switch board away, there is a small gap in which you can put your screwdriver to slowly lift it up. Do not lift up fully as it still has a ribbon cable attached, slowly turn over to one side and undo the brown cable clip, therefore releasing the cable and releasing the power switch board from your PSP console.
Saturday, August 14, 2010
A Brief History Of The Sony PSP
The Sony PSP comes out on sale in Japan in October 2004 for ¥19,800 for the basic model and ¥24,800 for the value version. It sells 200,000 units on the first day.
In March 2005 the Sony PlayStation Portable launches in North America for $249, approximately $20 more than the Japanese price and $100 more than the Nintendo DS. 500,000 PSP units are sold in the first two days.
The UK version of the PSP is released (1000 series) in September of the same year for £179, at the time over $100 more than the US price. All 185,000 units sell out in the first three hours doubling the Nintendo DS record on launch.
In June 2007 the next generation of Sony's PSP is announced (2000 series) as the 33% lighter, 19% thinner PSP-2000 and is the first of the Slim and Light series. It supports USB charging, has a composite TV-out and twice the RAM taking the memory up to a healthy 64MB. The screen is brighter and the UMD speedier to load.
In September 2007 the Sony PlayStation Portable-2000 series goes on sale worldwide.
The PSP-3000 is announced in August 2008. The 3000 series is virtually identical to the previous 2000 series version, but does feature an improved LCD screen with a better contrast, a faster response time and an anti-reflective coating.
In October 2008 The PSP-3000 series version goes on sale worldwide
The new PSP Go officially launched in June 2009, the latest Sony PSP version comes with Blue tooth, a smaller 3.8-inch screen and at 43% lighter than the original PlayStation Portable. The UMB has vanished and instead is replaced by 16GB of internal flash memory for digital downloads plus a Memory Stick Micro port.
In October 2009 the PSP Go is released in the US and the UK.
In March 2010, 60 million PSP units reported sold worldwide in total making this console a true global phenomen.
The PlayStation Go is the fourth model / version of Sony's hugely successful console and with technology changing all the time it will be interesting to see what Sony can come up with next for the PSP.
Tuesday, June 15, 2010
Buying and Selling PSP's on EBay
There is an opportunity to make some money doing this, now you are not going to become a millionaire but a small amount of money extra coming in, can be a big help especially in this so called recession. At times I have bought a faulty PSP for as little as £12.50 and sold it as high as £65, sounds good but if you are selling on EBay you have certain fees and of course you will need to pay out for parts in order to fix the problem.
As for selling on EBay the fees include, a small fee for listing it on there auction site, they then take a 10% cut of your final selling price (This is based on the UK version). So if you sell your Sony PlayStation Portable for £60 (not including post and packaging) EBay will charge you a £6 final selling fee.
There are other fees to take into consideration as well, I always use Pay pal as it is the easiest and safest way. If you sell your item and the buyer pays via Pay pal, Pay pal will charge a small amount for the privilege. In fairness this is well worth it as you know that your item has been paid for as it goes direct into your account, so you can then post it out to the said buyer. This then leads us onto the cost of posting, which can vary depending on size, weight and location. You also need your packaging materials like bubble wrap, parcel paper and tape.
As to the repairing of the faulty or broken PSP, depending on the problem you could spend anywhere between £2.99 up to £35 on any one part in order to fix a PSP and then sometimes you may need more than one part. The most common repair I have come across is replacing the LCD screen, these can easily be broken by either dropping or sitting on the console. A screen for an original 1000 series PSP would cost about £15, whereas for a Slim & Lite 2000 series PSP the screen would cost more like £35. These are a straightforward repair and could be done within 15 minutes. Other common repairs are broken UMD doors or missing analog caps which are both very simple fixes or a faulty UMD drive which takes a bit more time, as in you have to investigate the problem by testing and cleaning and if not resolved removing and replacing the UMD drive itself.
So you need to write down and keep a track of all your costs in order to know what you need to sell your PSP for in order to make a decent profit per item. When looking for faulty PlayStation Portables on EBay, always check the product description to see what the fault is then research how much it could cost to repair. With this in mind you will then know a figure in which you are willing to bid up to but not beyond in order for you to make a profit. Please bear in mind though that when you receive your item there may be further faults that where not mentioned on the original auction listing.
Now when it comes to selling especially on an auction website you are by no means guaranteed to get the price you want, you run the risk so to speak. You can set a reserve price so it does not sell below a certain price but EBay does charge you a small fee for having this. You may find that you may only make £5 - £10 profit per console, which does not sound like a lot, but as you get more experienced you could then be able to turnover a higher amount therefore making yourself a decent bit of spending money.
Hope you have enjoyed this post, within it there are positives and negatives as to buying and selling on EBay, I did not want to come across as saying that buying and selling PSP's is easy and if you buy as faulty PSP, repair it and then sell it you can make a load of money. There are pitfalls as with everything in life, some repairs are simple, some are not. Repairing consoles and gadgets is not for everyone, you have got to want to do it.
Tuesday, June 08, 2010
PSP Advice - Removing The UMD door
 A common PSP problem is a broken UMD door, it can quite easily happen, certainly if the PSP console has been dropped for example. Now first of all there are two screws that hold the UMD door in place and they are two of the seven screws as mentioned in previous post from the LCD screen housing plate. So basically when you have removed the LCD plate all you need to do is place the PSP console face down and gently slide your Flathead screwdriver as picture above shows into the bottom left hand side and slowly prise it away from the console. Once you have that side out you can then pull the other side free.
PSP Advice - Removing The LCD Screen Housing Plate

Once you have undone these screws, you then need to gently pry the housing plate outwards, with a small Flathead screwdriver separate the tabs between the D-Pad (where the directional buttons would be if the faceplate was attached) and the LCD housing plate. Once this is done slide the UMD door latch over so the UMD door comes open, as before gently prise the LCD housing plate from your PSP console.
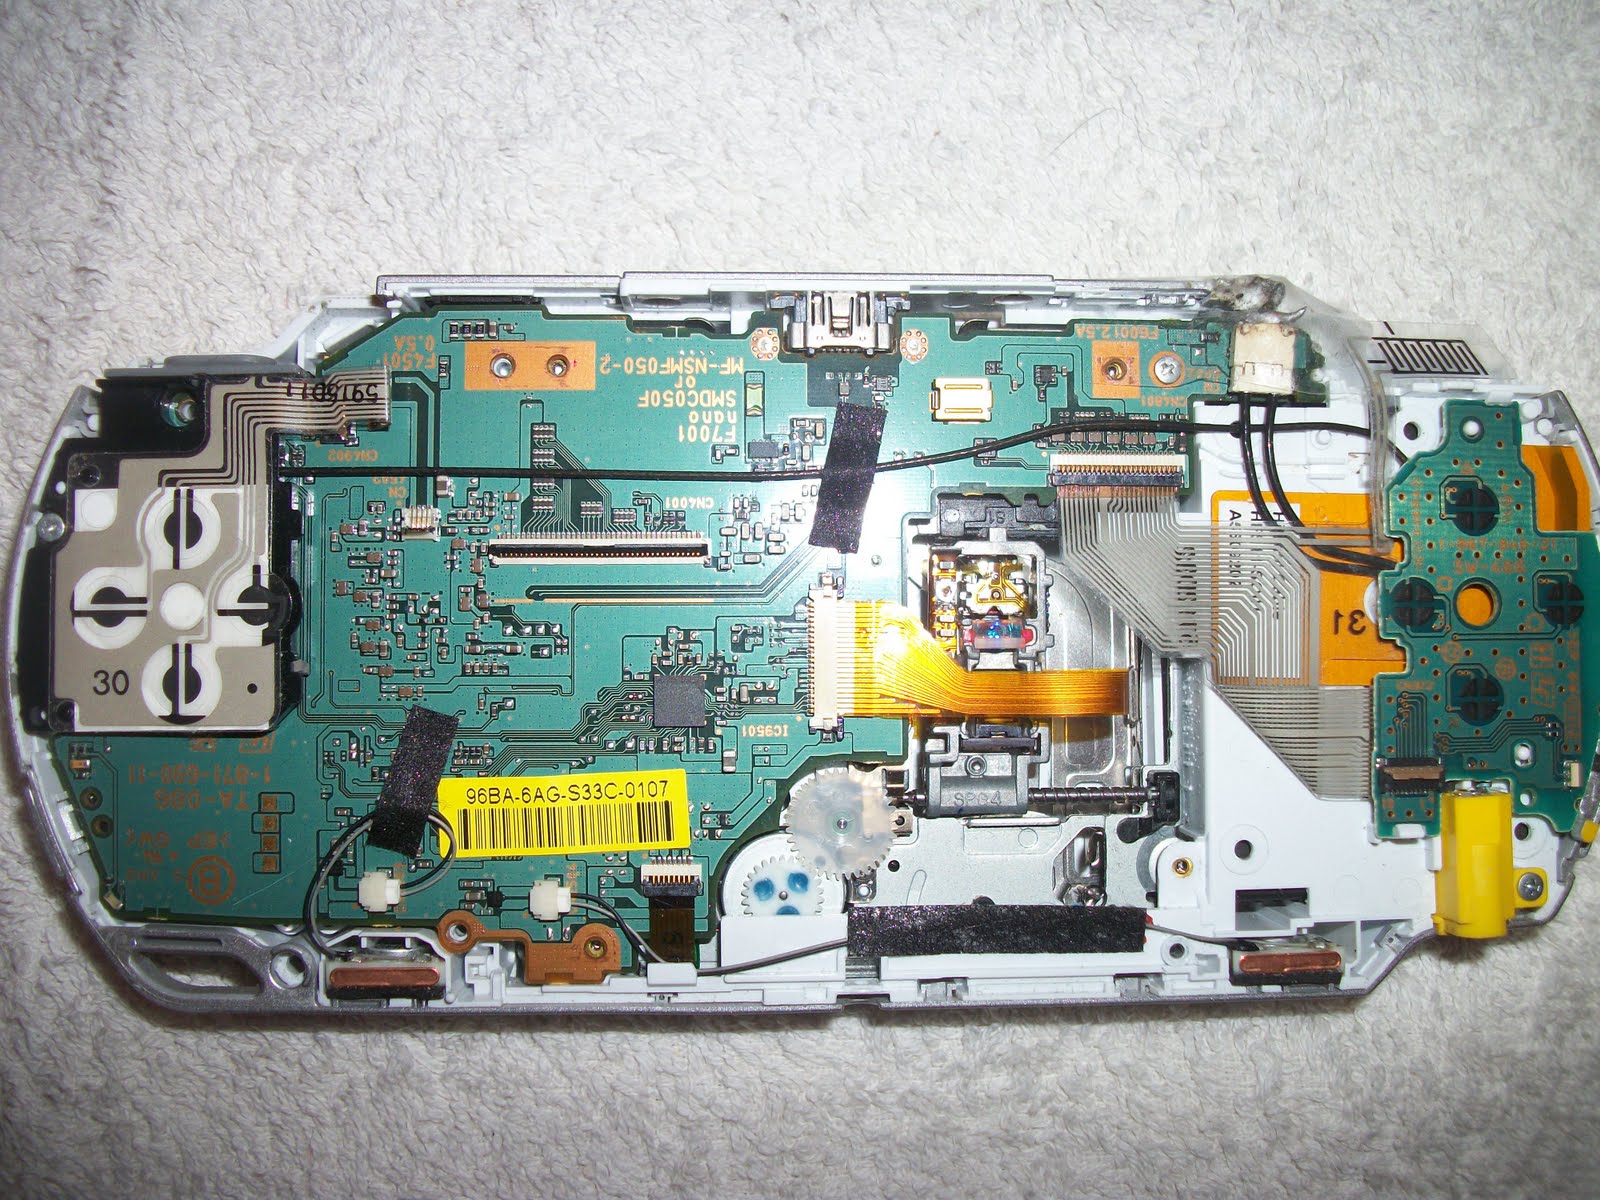
Once you have removed the plate, you will then have clear visibility of the MBO (Motherboard) as the picture shows above. From here you can then go on the fix / repair other parts of your PSP.
Sunday, May 30, 2010
PlayStation Portable LCD screen replacement
Saturday, May 22, 2010
PSP Advice - Replacing a PSP LCD screen
Again for this you will need your trusty small Flathead screwdriver. Gently on the left hand side slide your screwdriver into the groove between the screen and the LCD housing as pictured below. There are two places to do this, one at the bottom left hand side and again on the top left hand side.

Doing this will pop the tabs on the LCD housing bracket that is holding the LCD screen in place. You will then be able to lift the left hand side of the LCD screen up then gently pull the LCD screen so it comes out of the other side. Once this is done you can tilt the LCD screen so it sits upside down out of the metal LCD housing bracket as pictured below.

The screen is connected to the motherboard by two connector cables, but you have to be careful at this stage so that you do not pull the screen connector cables from there clips. This could damage both the screen cables and the clips on the motherboard, then a simple repair turns into a major one.
The larger cable flex is for the screen itself, the smaller one is for the back light. With your Flathead screwdriver lift the connector clips and this will then release the LCD screen. Again be gentle doing this, too much pressure and you could damage the clip.

If you are replacing your LCD screen simply take the new one out of the packet, place the screen cable flex's back in the connectors, the back light cable flex needs gently pushing in with the screwdriver, if you look closely at one it has little arms on the side which you can use just to slide in. Once the cables are in just do the reverse of above instructions and you will then have a fully functioning PlayStation Portable. If you are removing the screen to carry out another repair, place the screen face down on the PSP faceplate, this will then keep it free of dust and scratches etc.
PSP Advice - Removing The PSP Button Bar
The button bar is the silver strip along the bottom of your LCD screen which enables you when the faceplate is intact to press the home, volume, screen darkness, mute, select and start buttons. If for some reason one of them particular buttons is not working you will need to replace the button bar. Generally though if you want to do any repairs on your PSP such as replacing a broken LCD screen you will need to remove the button bar anyway.

As you look face down as per the picture above, at your PlayStation Portable, you will need your small Flathead screwdriver just to gently slide underneath the button bar and slowly lift up until it comes away from the LCD housing plate.

The button bar has flex cable attached which is connected at the above point on the PSP power switch board, all you need to do is gently lift the connector clip and pull out the button bars flex cable, again use the small Flathead screwdriver the lift the clip. These connector clips can break easily if you use excessive force, so do take your time. Once you have unclipped the button bar, put it in a safe place and then you can continue on to remove the LCD screen.
Saturday, May 08, 2010
How To Open A PSP (2000 series)
Much is the same as opening a 1000 series PlayStation Portable, there are still seven screws you need to remove although not in the same positions as the forementioned 1000 series.
There are only two screws in the battery compartment, pictured below

There are a further two screws at the top of the console

One on the bottom
and lastly two more on the other side of the UMD door.

So there are the seven screws, again the only tool you need to remove these screws is a Phillips 000 screwdriver. Once you have removed the above screws you can remove the front faceplate and then continue to do whichever repair is required, of these I intend to go through in more detail in future posts.
Sunday, May 02, 2010
What Tools Do You Need To Open Up A Sony PlayStation Portable
You have to spend a bit of money on getting the right screwdrivers, you need to be wary of sets that are too cheap. When first starting out I purchased a PSP opening kit off EBay for about £1.99 and I ended up stripping screws, unable then to get them out. Not a good start when you cannot even open up the console. Now there are ways of removing stripped screws but you can risk further damaging your PSP.
So the Phillips 000 and the small Flathead screwdrivers are generally the only tools I use, but there other items that come in handy, such as
a can of compressed air (good for getting dust of the screen and for cleaning a UMD drive unit)
a cleaning cloth (you can purchase these off EBay for low prices, this enables you to wipe your front faceplate screen without scratching or marking it)
and
sellotape (this is just so you can keep your screws together and remember where they came from. The PSP has various screws and all have a specific place, the last thing you want do is loose some or forget where they go)
In general there is not a great deal you need, just take your time and you too can open up a PSP.
Saturday, May 01, 2010
How To Open a PlayStation Portable (1000 series)

This post is based on opening up an original PSP console (1000 series)
There are seven screws that will need to be un-done for you to open up your Sony PlayStation Portable device. First of all put your console screen side down on a soft and clean surface as pictured to the left (to avoid scratches to the faceplate screen)and also ensure there is no memory stick or UMD in your device before starting.
There are four screws in the battery compartment, you will need to remove the battery cover and of course the battery, once completed you will see two of the four screws. You then need to remove the warranty sticker which is generally the smaller of the two stickers that you find in the battery compartment. Underneath the warranty sticker you find the other two screws.
If your PSP is still under warranty then please do not remove the sticker, as it will make the warranty void. If you have an issue with your PlayStation Portable and it is under warranty then you can send it to Sony and they should sort the problem with no charge, send it back with the warranty sticker removed or tampered and they will charge you to have it fixed and I can imagine that would not be cheap.
There are another two screws on the other side of the UMD door, please note these two are generally the trickiest screws to remove as there are deeper within the back faceplate, you need to use a longer arm screwdriver or you risk damaging the back of your PSP.
The last screw is on the bottom of the console. Once you have removed all seven of this screws you can then gently remove the front faceplate, this will then reveal the actual LCD screen and power switch board etc.
It is important to keep all your screws organised so you know where each of them belong, otherwise your PSP will not go back together correctly.
Also try not to be to forceful when removing the screws, if you do the screw head will loose shape and you may not be able to get it out at all. This also applies when putting the screws back in.
Hope this has been of some help.
Friday, April 30, 2010
Why Repair a PSP?
There are many console repair companies on the internet and obviously Sony themselves but there is no reason why most repairs can not be done by yourself at home in your spare time.
Now it is not for everyone, not to say that you need a massive amount of technical knowledge but some of the repairs can become quite complicated, ie, motherboard issue or replacing a UMD drive. It is okay taking a PSP apart but you need to be able to put it back together again, you need to keep track of which screws go where and that all you connector cables/ribbons are connected, but it is all possible with a little bit of time and patience.
In most cases you can get all the replacement parts you need of the internet and cheaply too, especially from Ebay. If you are in any doubt about fixing a PSP console youself then ofcourse let a professional look at it for you, but otherwise give it go and if you find you can fix the problem yourself you will find it extremley rewarding whilst also saving a bit of money in the process.